SIGACCESS
ACM's Special Interest Group on Accessible Computing
- SIGACCESS
- Mission Statement
- Leadership
- Join
- Local Chapters
- Contact
- RSS Feed
- Calls
- Call For Papers
- Call For Nominations
- Call For Award
- News
- ASSETS (Conference)
- Current ASSETS Conference
- Most Recent Proceedings
- Past ASSETS Conferences
- Related Conferences
- Resources
- Accessible Conference Guide
- Accessible Virtual Conferences
- Accessible Writing Guides
- Describing Figures
- Accessibility FAQ Page Generator
- Accessible PDF Author Guide
- Accessible Presentation Guide
- Conflict of Interest
- Thesis Repository
- Download Logo
- ACM Diversity and Inclusion Council
- Access SIGCHI
- TACCESS (Journal)
- Anti-Harassment Policy
- Awards
- Outstanding Contributions
- Impact Award
- Best Paper
- Best Student Paper
- SIGACCESS Travel Scholarship
Accessible PDF Author Guide
Create an accessible ACM submission using Adobe Acrobat Pro XI
Shari Trewin, August 2014
This page gives step-by-step instructions for how to add basic accessibility information to a PDF document intended for ACM. ACM publications are read (and reviewed) by many people. Making your paper accessible will help to promote the equal participation of people with disabilities in science and engineering.
These instructions are also available as a captioned video.
Note: If you are using Word on a PC, start by adding accessibility directly to your Word document. It will be automatically transferred into every PDF you generate.
These instructions are for Adobe Acrobat Pro XI. Please see Adobe’s best practices for detailed instructions covering more versions of Adobe Acrobat.
Steps
- Check fonts are embedded
- Set title and language
- Add tags
- Add alternative text for figures
- Set tab order
- Mark table headers
We encourage you to go the extra mile, especially for a camera-ready paper.
Step 1. Check fonts are embedded
Font embedding is an ACM requirement. If fonts are not embedded, your PDF will need to be regenerated, and you may lose accessibility that you have added.
How to check fonts are embedded:
- Open your pdf file in Adobe Acrobat Pro XI
- Type Command-D to bring up the document properties dialog.
(Menu option: File->Properties)
- Select the ‘Fonts’ tab.

- Check that all of the fonts have ‘Embedded Subset’ in parentheses after the font name. There is one exception, illustrated below. The font ‘Times-Roman’ with type=1 and Encoding=custom is generated when tags are added to a pdf document by Adobe Acrobat Pro. It does not appear in the document and does not need to be embedded.
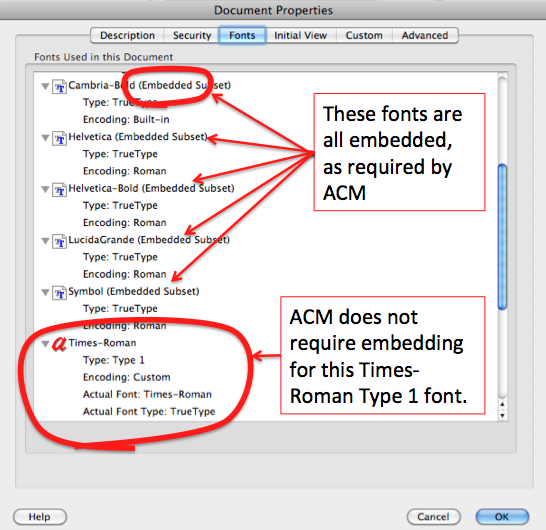
If fonts are not embedded, regenerate your pdf with embedded fonts BEFORE going further with accessibility.
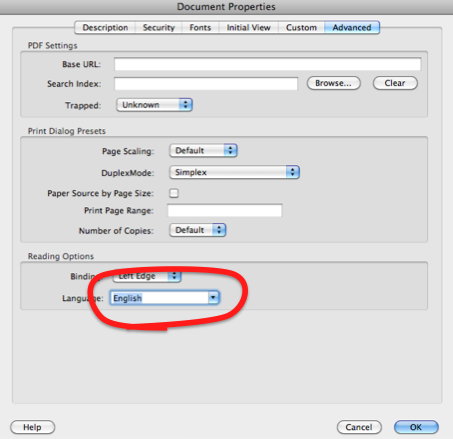
Step 2. Set title and language
- Type Command-D to bring up the document properties dialog.
(Menu option: File->Properties)
- Select the ‘Description’ tab.
- Fill in the ‘Title’ field with the paper title.

- Select the ‘Initial View’ tab.
- In the ‘Window Options’ area, in the ‘Show’ drop-down box, select ‘Document Title’.

- Select the ‘Advanced’ tab.
- In the ‘Reading Options’ area, in the ‘Language’ drop-down box, select ‘English’.
Step 3. Add tags
Tags allow assistive technologies used by people with disabilities to interpret the document. To check if your document is tagged:

- Type Command-D to bring up the document properties dialog.
(Menu option: File->Properties)
- Open the ‘Description’ tab.
- Look for ‘Tagged PDF: Yes’ among the set of advanced properties.
If the advanced properties list has ‘Tagged PDF: No’, follow these steps to add tags:
- Go to the ‘View’ menu.
- Select ‘Tools’
- Select ‘Accessibility’

- The accessibility tools will open in a panel on the right.

- Select ‘Add tags to document’.

Step 4. Add alternative text for figures
- Go to the ‘View’ menu.
- Select ‘Tools’
- Select ‘Accessibility’
- The accessibility tools will open in a panel on the right
- Select ‘Set Alternate Text’.

- Select ‘OK’ in the dialog box.

- Provide a written description that captures the content and function of the image as succinctly as you can. This is what will be spoken to readers who cannot see the figure. You do not need to repeat any information that is already in the document text or figure caption.

- Repeat for all images in the paper. Click the right arrow to move to the next image.

Step 5. Set tab order
- Select the Page Thumbnails icon at the upper left of the document view.

- Click on any page.

- Type Command-A (or Ctrl-A on a PC) to select all the pages.

- Right click to open the context menu.

- Select ‘Page properties’

- In the ‘Page Properties’ dialog, select the ‘Tab Order’ tab.

- Select ‘Use document structure’.

- Click ‘OK’ to close the dialog.
Step 6. Mark table headers
- Right-click on a table in the document.

- Select ‘Table Editor’ from the context menu. If there is no ‘Table Editor’ option, then open up the ‘Touch Up Reading Order’ accessibility tool, to see the document markup. If the table is marked as a table, try right-clicking on the table again with the ‘Touch Up Reading Order’ tool open. If it is not, use the ‘Touch Up Reading Order’ tool to mark up the table.

- The cells of the table should be outlined, and labelled either ‘TH’ (table header cell) or TD (table data cell). If the cells are not correctly outlined, then use the ‘Touch Up Reading Order’ tool to mark up the table.

- If any cells of the table are not correctly identified as header or data cells, right-click on the cell, and select ‘Table Cell Properties’.
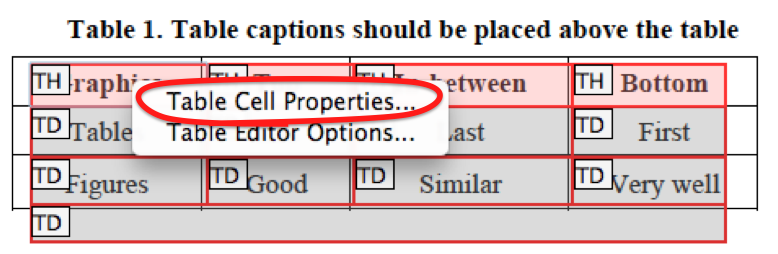
- In the ‘Table Cell Properties’ dialog, select the type of cell: Header Cell or Data Cell.

- If the cell is a header cell, indicate the scope – whether it is a header for the row, column, both or neither.

Go the extra mile
Following these additional steps will make your paper even more accessible.

- Use the ‘Touch Up Reading Order’ tool to check the reading order and mark up headings. This makes your paper easy to navigate.
- Run the accessibility checker to see if there are further accessibility issues in your document. The checker produces a report that provides help with fixing many accessibility problems.
Karyn Moffatt is an Associate Professor in the School of Information Studies at McGill University and the Canada Research Chair in Inclusive Social Computing. She leads the Accessible Computing Technologies Research Group where she studies how computing applications can be designed to be more inclusive of diverse needs and preferences across the lifespan, especially with respect to supporting social engagement and interaction. Her work has been recognized with Best Paper awards from ASSETS, CHI, and CSCW. She currently serves as an Associate Editor for ACM’s Transactions on Accessible Computing (TACCESS), and recently served as Program Co-Chair for ASSETS 2020 and Sub-Committee Co-Chair—Accessibility and Aging for ACM CHI 2020.
Updates
- 26 Aug - Chieko Asakawa: Outstanding Contribution 2024
- 08 Aug - January 2024 Newsletter
- 23 Mar - Call for Papers ASSETS 2024
- 22 Mar - 2023 SIGACCESS ASSETS Paper Impact Award Winner
